Floating Technique
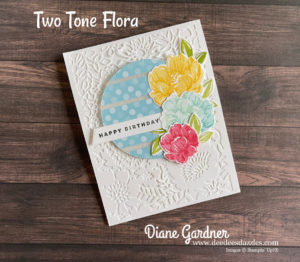
I saw this technique somewhere online and wanted to use it to make a card for my February classes. I made this last week and now I am having trouble remembering what products I used. If you want to duplicate a card later I suggest that you use a project sheet to quickly write down what you use to make the card. Oh, if I can just remember to do that!!! First the easy part – I used thick basic white for the card base (4 1/4″ x 11″ – scored at 5 1/2″) and regular basic white for the die cut front. I cut it the same size as the card front 4 1/4″ x 5 1/2″. I ran it through the largest die from Two-Tone-Flora dies. The pieces came out fairly easy and then I had to clean out the pieces from the die. Right then I decided not to do this as a class card because it would take too long for 20+ people to do the die cut. It is beautiful when it is ready to put on the card. I almost forgot – I put four small squares of the adhesive paper on each of the corners before I ran it through the Stamp Cut and Emboss machine. That way I did not need to mess with the glue getting everywhere. The three flower stamps from the Two-Tone-Flora were stamped with Daffodil Delight, Balmy Blue and Sweet Sorbet. For the more solid flower backgrounds, I stamped off one time before stamping it. It makes a not so pretty flower when you do not stamp off. The leaves were stamped four times using Granny Apple Green. The dies from the Two-Tone-Flora were used to die cut them all. The stamp set is a two step set and since there are photopolymer they are easy to line up. Next how I made the floating technique circle. For the circle, I used a four inch square of Vellum. I cut five strips of designer series paper 1/2″ x 3 1/2″ and attached them to the vellum leaving 1/8″ between the strips. The DSP is a Sale-a-bration item that is free with a $100 order. It is 48 sheets of beautiful coordinated paper. Check it out in the SAB brochure on page 14. I used my grid paper to help me line them up. I don’t think I could stamp with my grid paper. The circle was die cut using the largest circle from the Stylish Shapes dies. It was attached to the card front using the mini dimensionals. Be sure to place them where they do not show through the vellum. You could also use the window sheets for the background. The sentiment was stamped in Evening Evergreen using a stamp from the Something Fancy set. I used a die from the same named die set (do you just love that they have the same names now). They are all attached to the card front without dimensionals.
Product List ") | ") |  | ||
 | ||||
 |  |  |  |  |

 Designer Series Paper")


Stamping Hugs,
Diane